Part 1 of 3
Apr 19, 2025

Introduction
This is the first in a series of posts that will fetch and decode data that will be used to build the chart below in SwiftUI. In an earlier post, I wrote that one of my main goals with this blog is to explore the intersection between iOS development and open civic data, to figure out how Apple’s development tools can help us build with and visualize that data, learn from it, and share it with others. This first series of posts is a prime example of that.
A lot of blog content from iOS devs is geared towards beginners, where the principles and lessons you want readers to learn about are abstracted from the particular example you use to illustrate them. That's why examples often use dummy data and free testing APIs. The details of the example don't really matter. And that content is really important and beneficial when learning a concept—it was for me when I was learning, and still is.
But in this series of posts, the example of using civic and political data is actually central, not only because it allows me to demonstrate some of the unique considerations of working with this kind of data but also because I can take a more intermediate approach and move beyond the basics. In this case, we'll be creating a scalable, flexible network manager using async/await, generics, URLComponents, error handling, and decoding strategies.
This is also my first post on this blog focused on more traditional iOS dev content, so if you spot any mistakes, poor/incomplete explanations, or tips to improve the code, please let me know!
Part 1 (this post) will focus on creating a generic network manager in Swift
Part 2 will focus on creating a service class and endpoint protocol for URL construction
Part 3 will prepare the data model and build the chart in SwiftUI
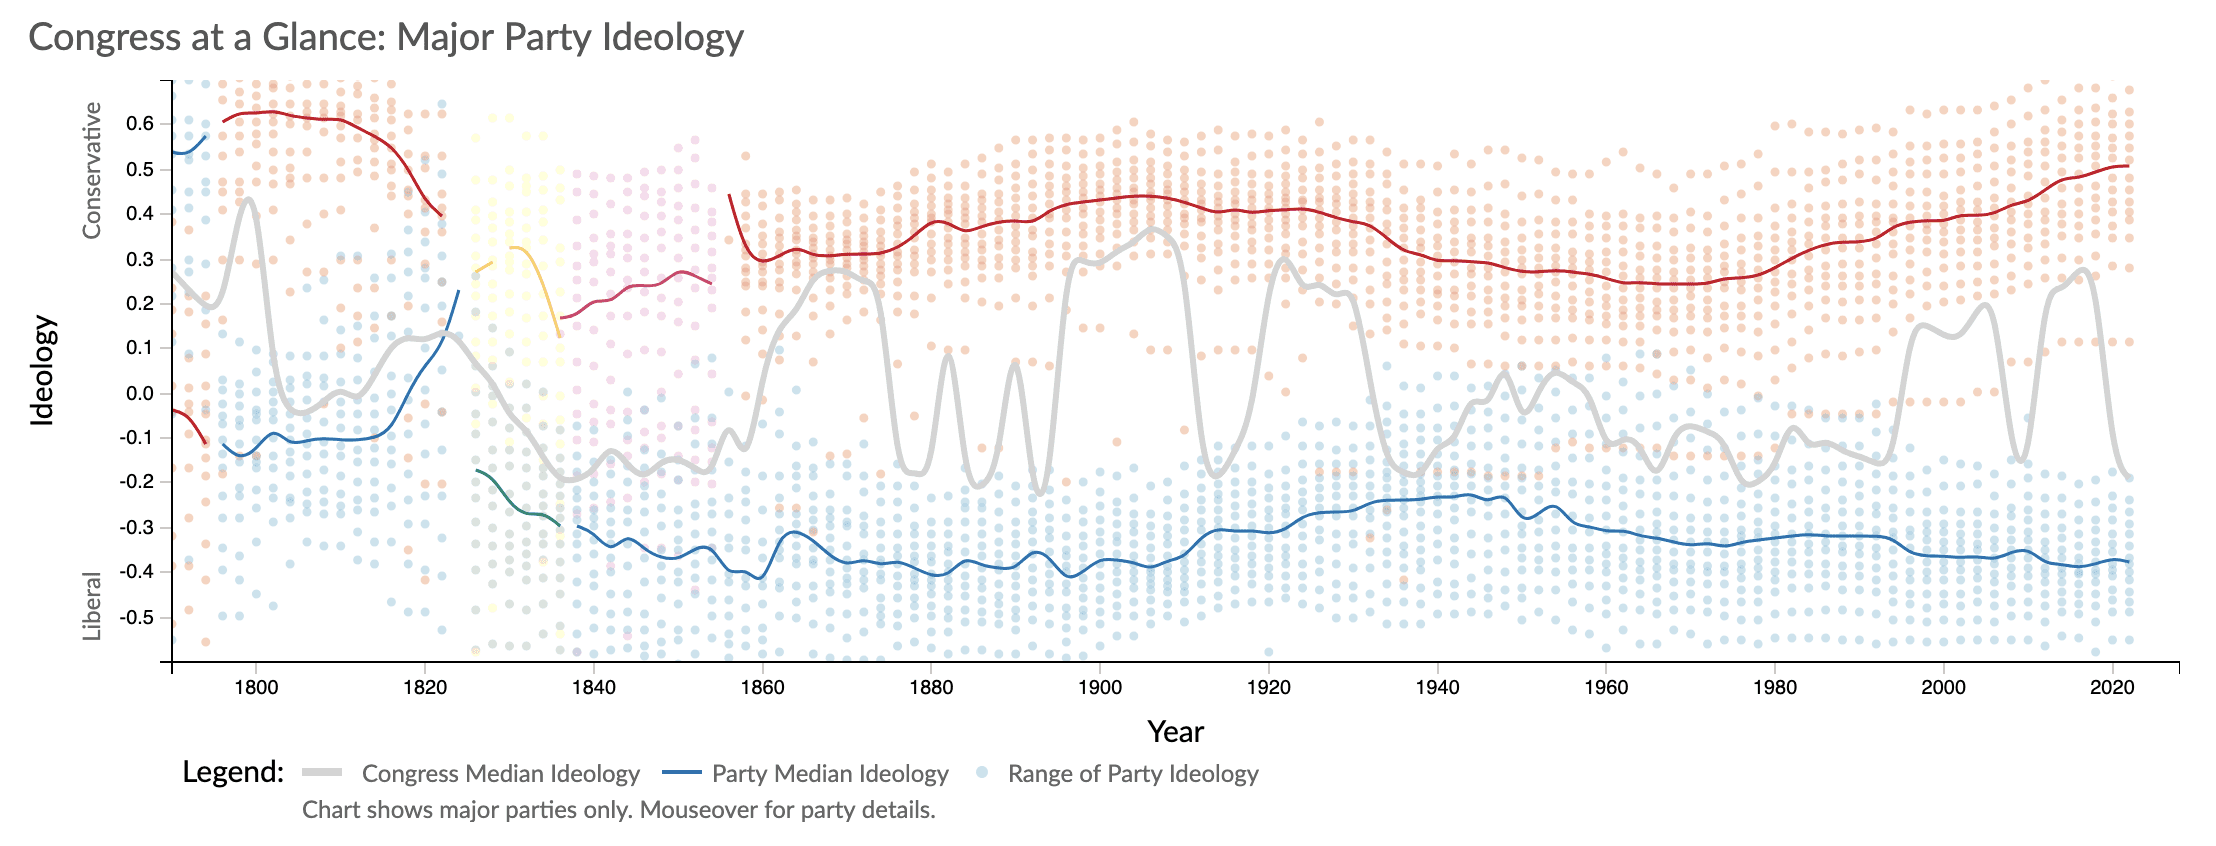
This chart, from voteview.com, shows the median party ideology of major political parties in the U.S. The x axis displays time, dating back to the very first Congress. The y axis ranges from -1 to 1 and plots the DW-NOMINATE score of the median member of each party in a line chart.
DW-NOMINATE (dynamic weighted nominal three-step estimation) is a statistical method used to estimate the ideological positions of legislators based on their roll-call voting records. Developed by Keith T. Poole and Howard Rosenthal in the 1980s, it places each legislator on a two-dimensional ideological scale, with the first dimension representing the traditional liberal-conservative economic spectrum (from -1 for most liberal to 1 for most conservative), and the second dimension capturing differences in social and cultural issues, such as slavery, currency policy, immigration, civil rights, and abortion. Since about 2000, the second dimension has become less significant to the point where “almost every issue is voted along ‘liberal-conservative’ lines.” (The chart above only uses the first dimension.)
DW-NOMINATE scores are designed to be comparable across different Congresses, allowing researchers to show how the ideological positions of individual legislators, parties, and the entire Congress have evolved. The method has become a widely used tool in political science research to quantify polarization and study voting patterns in Congress and is often cited by leading news organizations to measure the ideology of major political figures.
Perhaps the chart's most striking feature is the relatively sharp, but consistent, move to the right by the Republican Party over the past 50 years or so, while the Democratic Party has only shifted moderately to the left during the same time period.
If you're interested in reading an analysis of DW-NOMINATE data, this article from Pew Research on political polarization is pretty good.
Creating a generic network manager in Swift
It’s very common for iOS apps to fetch data from a remote server, whether they be for social media, banking, shopping, food delivery, etc. Here, I’m going to share the generic network manager I use in my app Informed to make network calls and decode the response so it can be used.
We're not going to be doing any major Swift Concurrency in this post, but for what it's worth, this code is also error-free with Swift 6 language mode and Strict Concurrency Checking - Complete turned on in Xcode 16.


We’re actually going to create not one networking function but three—depending on whether you’re decoding data from JSON, XML, or CSV—and use third-party packages for the latter two.
Let’s dive in.
💡 If you’re just getting started with iOS development or networking in Swift, here are some helpful resources for working with REST APIs and URLSession:
First, we create a class called NetworkManager with three properties for different decoding strategies and an initializer that has the same default values as JSONDecoder().
The
KeyDecodingStrategy.useDefaultKeysvalue doesn’t change key names during decoding.The
DataDecodingStrategy.base64value decodes data using Base 64 decoding.The
DateDecodingStrategy.deferredToDatevalue uses formatting from theDatestructure.
If you’re going to be working with a lot of different APIs, you may encounter cases where the JSON response has dates that come in a variety of formats, or property names that are written in snake_case instead of camelCase. Setting up these decoding strategies now lets us choose the strategies we want when we initialize NetworkManager() and helps us quickly support new APIs with different data formats.
Second, we have the method declaration that decodes a generic type, T, that conforms to Decodable and takes in an endpoint that conforms to a custom Endpoint protocol. Endpoint will be described more fully in part 2 of this series, but for now, you only need to know that it helps us construct the URL for the network call, so if you already have a URL or string, you can pass that in instead of the endpoint. The function is also asynchronous and can throw errors; below, I’m using typed throws, which are new in Swift 6, with throws(NetworkError)instead of just throws, but as of now, I don’t think typed throws are supported in asynchronous functions, so when we throw an error we still need to explicitly say, for example, NetworkError.invalidURL.
To resolve the error relating to the endpoint, you can add the below code.
When working with several APIs, endpoints, and query parameters, URLs can get long and complicated and using static strings can lead to potential typos. URLComponents gives us a safer way to construct URLs from their constituent parts and are automatically percent encoded. Using the scheme, host, path, and query items from the provided endpoint, we have all the parts necessary to construct URLs, or at least all the ones we’ll be working with.
We can build the URL, which is optional, with the components.url property and check that it’s valid using guard let. If not, we can throw a NetworkError.invalidURL and pass in the constructed URL to inspect it in the console or logs. NetworkError is a custom error enum that conforms to Error and describes various possible reasons a network call could fail.
Next, we use the shared instance of URLSession to initiate the network call and await the result, which is a tuple of type (Data, URLResponse); the response can be downcast as an HTTPURLResponse in order to obtain the response’s status code. Status codes indicate whether a specific HTTP request was successful or not. Codes between:
200 and 299 indicate a success
400 and 499 indicate a client error
and 500 and 599 indicate a server error
If the code is not between 200 and 299 inclusive, we throw NetworkError.invalidStatusCode(url:statusCode:). Then we initialize the decoder and assign either the default decoding strategies or the ones we passed in when creating the NetworkManager instance. At this point, we attempt to decode to T.self from the data and, if successful, return the response.
There are a number of ways decoding can fail. Maybe the API’s structure has changed and a property that used to return a Double now returns that same value but as a String, or maybe a key or value wasn’t found when decoding. If an error occurs, it’s always good to get as much detail as possible to quickly identify the cause. Below, I go through the different decoding errors that can occur (dataCorrupted, keyNotFound, valueNotFound, and typeMismatch). There might be a neater way to write it out, but credit to vadian on Stack Overflow for sharing this, as it’s been really helpful for debugging.
Bonus: Custom date decoding strategy
If you ever run into APIs that use multiple date formats, you can set up a custom date decoding strategy. The strategy below takes in a list of date formats you want to check for, loops through them to attempt to decode the date, and then either returns the date or throws an error. (I didn't come up with this but unfortunately can't find the Stack Overflow post I got it from.)
Decoding XML and CSV from network data
If we happened to be decoding XML instead of JSON, we would just need add the XMLCoder package to our project and make one small tweak to use XMLDecoder() instead of JSONDecoder(). Since there’s a good amount of overlap in the code here, we could probably combine this into our first function, but leaving them separate helps keep our methods small and readable.
For CSV data fetched over the network, we can use the CodableCSV package. The package’s CSVDecoder transforms CSV data into a Swift type conforming to Decodable. The decoding process is quite simple and only requires creating a decoding instance and calling its decode function and passing the Decodable type and the input data. To help the decoder out, I also configured it with the .firstLine header strategy to indicate that the CSV contains a header row.
I've found that both of these packages are very easy to use and work well right out of the box.
And that’s it! We now have three network functions for fetching and decoding JSON, XML, and CSV data. In part two, we’ll take a look at the URL we’ll be using to fetch data and how to construct it.